
FAQ – TeamZWATT
Zpider
The Zpider will always fit on all frames of the following bottom bracket (BB) types: BSA threaded, BB30, PF30, BB30A, PF30A and BB right.
In the special case of the BB386EVO or BB86, sometimes the Zpider will fit and sometimes it won’t. The fit depends on the shape of the frame at the BB area. Luckily there’s a way to make absolutely sure whether the Zpider will fit your BB386EVO/BB86 frame. It goes like this:
——————————————————————————————
Cut a strip of paper of length 154 mm and width 7 mm. Tape the ends together such that it forms a small cylinder. Now you made your very own fitting-device. Slide the cylinder over the BB area of your frame (the crankset should be removed for this part).
Does the frame/BB stick further out than the paper cylinder?
NO: The Zpider won’t fit your BB386EVO/BB86 frame.
YES: the Zpider will fit your BB386EVO/BB86 frame.
Zpider is based on FSA’s Gossamer crankset with a BB386EVO spindle format. This fits most bikes. You can read more in the support guide to picking the right accessories. At this guide, please read also the link to the guide to BB386EVO compatibility
If you have a wide frame with press-fit bearing, please be careful. The Zpider gen 1 will not fit all wide press-fit frames.
It depends on what style of frame and bottom bracket you are using. For proper installation please follow the Zpider first time install guide.
In this special case, we recommend to place wave washer on a driving side instead of on a non-driving side. Tighten the crank arm as recommended and the problem is solved.
Unfortunatley Zpider will not fit properly to your bike, if you have 70 mm wide Italian threaded bottom bracket shell.
Unfortunately Zpider (and any other BB386EVO crank) won’t fit to your Trek bike with Trek BB90, as the frame shell width is too wide (90.5 mm).
No. It is integrated with the FSA Gossamer crankset. You will get a complete crankset, and simply just install chain rings in your preferred size.
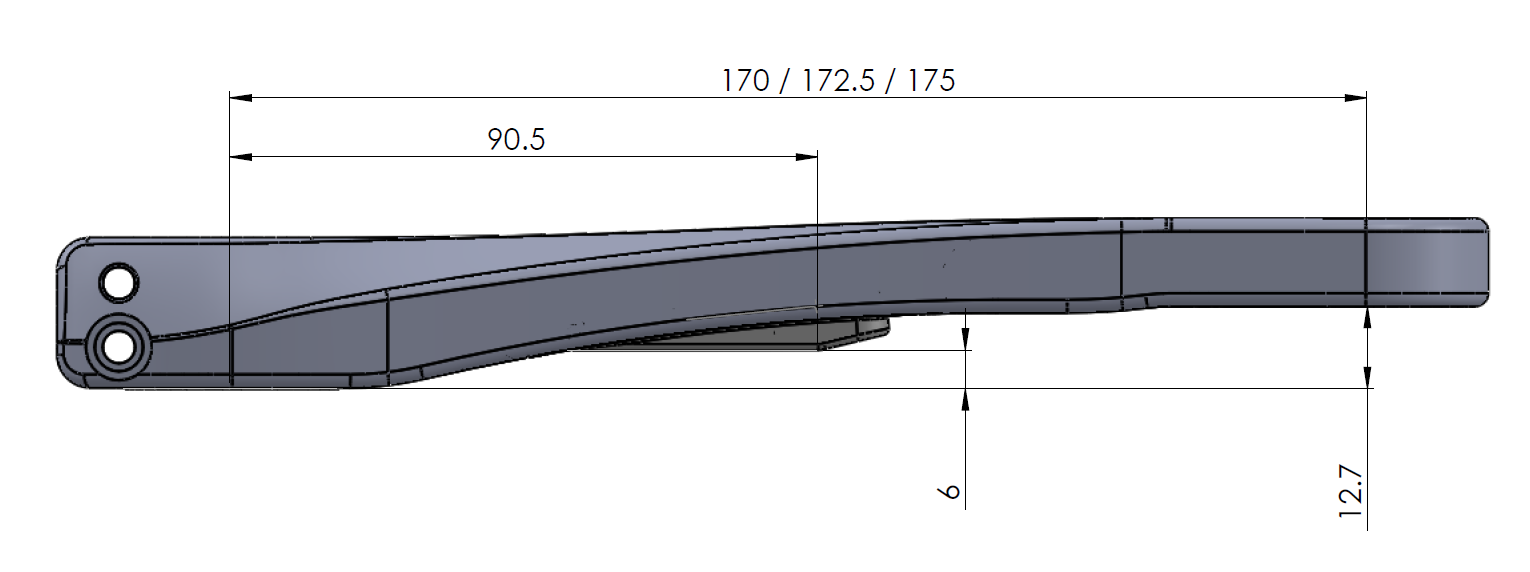
Yes. We have the 3 most popular lengths now: 170/172.5/175mm.
The Zpider model will provide dual leg power measurements and left/right balance.
If you have a set of Shimano style 4-arm 110mm BCD (introduced in 2013) you can fit them to the Zpider. You can also find a set of chain rings in your preferred size for the Zpider in our webshop and have that shipped with your Zpider.
No. Bolts are included at ordering the chain rings (they are specific to the different chain rings).
Yes. FSA Cranks are compatible with all of the above.
FTP20 Study
Everyone that can give us an all-out 20-minute FTP test every month for a whole year and upload it for our engineers to work on. Only Android users in EU/Switzerland/Norway are invited at this time.*
*Until stock lasts
Unfortunately, no. The study requires the special FTP20 Zpider power meters. Although, the FTP20 feature will soon be available on our Team ZWATT app on android and iOS.
The FTP20 feature will be rolling out to our iOS app as well. However, the FTP study is only available to android users.
You will only need to purchase it after you have installed your Zpider. You’ll find the link in your mailbox or in the package after you purchase the Zpider FTP20 Study Edition.
No. The Zpider FTP20 Study Edition will only work with the FTP20 Maintenance fee. And vice-versa.
The FTP study “package” doesn’t include any chainrings and bottom brackets. For the best fit, we recommend you use FSA Bottom Brackets and the Stronglight chainrings found in our webshop.
Zimanox
Zimanox will fit all Shimano HollowTech II cranksets unless you have clearance issues. Please check clearance also.
No, the Zimanox design is created with the help of Stronglight in France. They have verified the strength on a fatigue tester to the ISO standards. And we have verified the stiffness to be comparable to an Ultegra arm.
The Zimanox will show power calculated based on left leg power only.
This is because Zimanox only measures your left side.
You should make sure that the Zimanox will not interfere with the chain stays of your frame.
Take a look at the figure below. Get your ruler, and check that there is sufficient space on your frame. Note that all the dimensions in the figure are in mm.
Bolts need to be tightened 12 – 14 Nm. Please go back and forth from one bolt to another until they are both tightened between 12 – 14 Nm. Please note that torque needs to be checked regularly.
Please note that torque on the Zimanox’s bolts needs to be checked regularly.
General about Team ZWATT power meters
If your power meter is reporting 777 Watts / 77 Cadence on your head unit, it means one of several things is wrong:
- The monthly 30 minutes upload is not completed
- The maintenance fee is not paid
- The power meter wasn’t connected through the Team ZWATT app recently (required after every 15th rides)
If all this is okay, and you still get the 777 Watts / 77 Cadence reading, here are a few things to try:
- On Android: Run the troubleshooting guide in the app.
- On iOS: Try force-closing the app and restart it. Then connect to the power meter.
Good question. We get that a lot. But the real question may be: Why not?
You want to help us evolve the technology to the point where all your bikes can have a power meter without breaking the bank. So you want us to have an incentive to keep providing progress on that.
And we want you to keep providing real world ride data for our test database. So we want you to have an incentive to keep doing that.
So why not a monthly fee that we can discount when you upload data to us?
We also want you to have the lowest possible initial investment to start generating data for us. By splitting the price like that, we can offer you the lowest possible price to get started.
Yes, it will automatic compensate for temperature changes.
The power meter is specified for -10°C to +50°C but will probably work at -20°C as well.
This is where you come in – we will love it, when you test it out for us.
Calibration is done to set the zero offset of the highly sensitive torque measurement pretty much like the tare function on a kitchen scale.
Perform calibration as follows:
- Unclick from the pedals
- For Zimanox left crank arm is either pointing up or down.
For Zpider, the angle of the crank does not matter - Connect the power meter to your bike computer or TeamZWATT app.
- Hit Calibration under Menu (TeamZWATT app) or search for calibration function on your bike computer.
- Wait few seconds until you get the message, that calibration was successful.
Perform calibration before the ride and especially after mechanical changes at your bike.
We will not add the auto-calibrate feature to Zimanox, but may do that on the Zpider.
Yes. A crank based power meter needs to measure cadence in order to calculate the power.
Yes, the power meter technology we use is 100% direct measurement meaning they use strain gauges.
The measurements offered are: power, cadence, torque effectiveness (Zimanox only) and pedal smoothness.
Please send us data, preferably a .fit file together with raw data from your app. Only with data are we able to analyse this kind of issue and give recommendations.
Make sure you perform a calibration from the head unit or app before the ride. First thing we check is if your zero is good at the start. Never have any force at all on the pedals when doing the calibration.
Yes, mechanically the Power meter is 100% compatible for use with non-round chain rings, but any sort of oval or non-round chainring will affect power measurement. It is not a sign of poor quality or design of the power meters, but rather a question of simple physical character.
Our power equation assumes a constant velocity. The power meters assumes a constant speed throughout each complete revolution. With oval chainrings, the crank velocity will change during each pedal stroke, so you spend more or less time in certain parts of that pedal stroke. The net effect is that you’ll get slightly inflated power numbers using an oval ring. It can range from a few percent and can be as much as 5% increase, and depends on how odd-shaped your ring is.
We have better support for oval chain rings (O.Symetric, Absolute Black etc.) on the list of improvements we plan to do and release as a firmware update. Till that happens, you can use the function in the app under Settings > Power Measurement Trimming to slightly adjust the power reading from the power meter. Enter 2 to increase the power output reading by 2%.
If the green light in the charging pod comes on, your USB charger is connected and on. Good.
If the red light does not go on when you connect the charger pod to the power meter that is unusual. If the two contact points does make contact the red light should go on. If not, here are a few things to try:
- Try wiggling the charger around a bit and see if you can get the red light to turn on
- Check the two contact points on the charger are “sticking out” (spring loaded contact points – so called pogo-pins). Could they be stuck somehow?
- Are the contact points on the power meter clean? (we have seen one case of a thin layer of glue on the contact point)
- If you tried to charge your power meter using your laptop and it did not work. Plug the charger in to the power socket and it should work.
You can try the following options:
- We would highly recommend closing all other apps that use BLE connection on your smartphone before start riding. Also to turn your BLE off and on again, before the start of the ride (to clear out any other connections) is recommended.
- Switching location of your smartphone. If you carry your smartphone in the back pocket, we would recommend to place it either on the left side (Zimanox), or on the right side (Zpider). Furthermore you can try to experiment with placing the smartphone on a handlebar holder, in a water bottle cage, saddle bag, or other location to see if it is able to keep more consistent connection.
If you experience that your power readings are dropping at your bike computer (using ANT+ connection), it is likely that your bike computer isn’t receiving all of your data packets due to your ANT+ signal receiving interference.
ANT+ is locked to a single frequency, and much like other wireless signals, operates on the 2.4 GHz band. Usually ANT+ signal interference isn’t a power meter problem, but a problem with your setup or environment.
Below you can find the most common causes for interference and dropouts that we have seen.
- Firmware is not up to date: Please make sure that your bike computer and power meter firmware is up to date. You can find the list of the latest power meter updates at the end of FAQ.
- Physical distance and barriers: The location of the bike computer can have a big effect on receiving power data from power meter. We would recommend to place bike computer on a handelbar, due to the static position in relation to the meter. Make sure that there are no barriers, that could block the signal. If you are still having issues try to experiment with slightly changes to the position of the bike computer.
- Wireless signal interference and fans: If you are experiencing drop out while riding indoors, the signal may be interrupted by another wireless signal or fan. By changing location of your trainer or rollers, could make a huge difference. Potential wireless signal interference sources are: Bluetooth headphones, speakers, or hearing aids; WiFi router; Microwave ovens; Direct Satellite Services (the coaxial cables and connectors can cause interference); Power sources (includes power lines or a breaker box in a wall); Cordless telephones; Wireless video transmitters (e.g. Chromecast, AirPlay, etc.); Wireless speaker; Certain external monitors and LCD displays; Any devices that use a cable to connect to a computer or power source; Anything else that transmits a wireless signal, from routers to baby monitors.
- Battery: If you are experiencing dropouts, please make sure that your power meter battery is fully charged.
Yes, data is transmitted through BLE and ANT+ on all our devices, so you can use them with either our own or a third-party mobile app, and your bike computer simultaneously (BLE is often referred to as Bluetooth Low Energy, Bluetooth 4.0 or Bluetooth Smart).
Zwift is compatible with most newer PC, Mac, iOS devices and Apple TV. We tested it on iPhone and PC.
- If you are using iPhone you need to pair power source (in your case Team ZWATT power meter) and Zwift app via BLE.
- If you are using PC, you have two options to connect your power meter with Zwift. To get connected via BLE you need to use free Zwift Mobile Link app (for Android and iOS mobile devices) to send BLE signals to Zwift on your computer. To get connected via ANT+ you need ANT+ dongle and you can simply connect with your power meter at the Zwift.
For more detailed information regarding Zwift, please see Zwift support pages.
Yes. Come on – we are from Denmark. What do you think? We test to IP67 level (look that up on Wikipedia if you need).
It is displayed in our app, may be seen in third party apps that follow the standard protocol and most head units/bike computers.
Our recommendations for setting up your Team ZWATT power meter with a Garmin Edge 1030.
Pairing your Edge 1000 with your Team ZWATT power meter:
To add your Team ZWATT power meter as a sensor, follow this touch screen key path on your Edge 1000:
MENU > Settings > Sensors > Add Sensor > POWER > When the ANT+ ID appears that matches your power meter, check the box > Add
Zero resetting a power meter using the Garmin Edge 1000:
You must zero reset your Team ZWATT power meter after installation, and we recommend zero resetting once-per-week to keep your meter reading with maximal consistency.
To zero reset using your Edge 1000:
Rotate your Team ZWATT power meter one full revolution to wake the meter then click the ‘Calibrate’ function under the Power sensor profile.
The ‘Calibrate’ Zero Reset function can be found through this key path:
Press ‘Tools’ icon (screwdriver and wrench on the main screen) > Sensors > Power > Calibrate. Your Garmin Edge 1000 head unit will then return a Zero Reset (Calibration) value.
The Edge 1000 also offers a shortcut to power meter calibration on the status bar. Swipe down from the top of the screen and select “Calibrate” from the status bar menu.
Our recommendations for setting up your Team ZWATT power meter with a Garmin Edge 520.
Pairing your Edge 520 with your Team ZWATT power meter:
To add your Team ZWATT power meter as a sensor, follow this touch screen key path on your Edge 520:
From the home screen, press DOWN to access the Menu > Settings > Sensors > Add Sensor > Power > Confirm that the correct ANT+ ID is discovered > Add Sensor
Zero resetting a power meter using the Garmin Edge 520:
You must zero reset your Team ZWATT power meter after installation, and we recommend zero resetting once-per-week to keep your meter reading with maximal consistency.
To Zero Reset using your Edge 520:
Rotate your Team ZWATT power meter one full revolution to wake the meter then click the ‘Calibrate’ function under the Power sensor profile.
The ‘Calibrate’ Zero Reset function can be found through this key path:
From the home screen, press DOWN to access the Menu > Settings > Sensors > Power > Calibrate. Your Garmin Edge 520 head unit will then return a Zero Reset (Calibration) value.
If your power meter has worked previously, but is now unable to connect, please try to do the following:
- If you can’t get your power meter to connect with Team ZWATT app, we would suggest to reset power meter, by attaching charging pod for a few seconds and also to reboot your phone.
- If you can’t get your power meter to connect to your bike computer, we would suggest you to check that you have selected the correct profile that has your power meter saved into it. If the profile is correct, please make sure that the sensor ID is also correct. For Garmin head units, you can find sensor ID under power meter settings –>Sensor Details.
- It could also help to simply restart your bike computer, by switching it off and on again. Also make sure that your bike computer has latest firmware update.
My account
Go to My Account here. You can also find the link in the footer at the bottom of the page.
You can create your Team ZWATT account by following this link. Here you can sign up and also log in to your account.
When you have created an account here on our website and bought maintenance fee, go to settings in the app and type in your account info. Activate the power meter by turning the crank arm a few times and start the app on your phone.
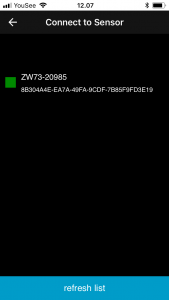
Get connected with your sensor by clicking on Menu –> Connect to Sensor and select the sensor you would like to connect to.
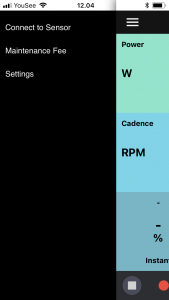
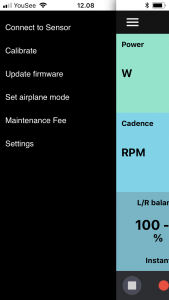
Go back to the dashboard view. Click on the Menu –> Maintenance fee –> Assign.

You get a pop-up window and click OK.
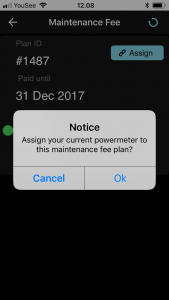
By clicking OK your power meter will be assigned to your account (subscription).
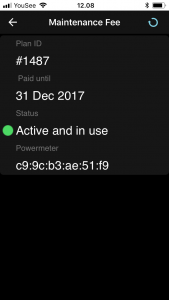
When the account and the power meter are linked, the power meter will automatically know when the maintenance fee is paid and keep your power meter running.
Note also that when your app has been assigned an account, you can see the account name in the bottom of the settings screen.
You can stop your monthly payments by logging in to your Team ZWATT account. Click on the Maintenance fee (left side) and after that find your active maintenance fee and click View. To stop your monthly payments click Cancel. You can always resubscribe, by clicking on the Resubscribe sign.
Sure thing. Just create a new TeamZWATT account and pair the power meter with your subscription via our app.
You can create your TeamZWATT account by following this link. Here you can sign up and also log in to your account.
You can update your credit/debit card details by logging in to your TeamZWATT account and update it under Payment methods.
My uploads
The primary goal is to use diverse data to optimize the software algorithms. Different biking styles and surfaces matter a lot in estimating cadence and thus power. As an example: for MTB we have been chasing the dreaded power spikes from vibrations that many power meters seem to have issues with (experiencing power spikes means you can’t trust your max value, and you start to question other data). We think we have that pretty much under control and are outperforming other power meters output as we can see it on Strava – but having more diverse data would definitely help us improving this further. Constant improvement is the name of the game and our Team ZWATT members will make their own power meter better.
We basically ask for two types of data:
- Background data and opinions through quick and simple surveys.
- If you are in one of the power meter groups, we ask you to share the raw GPS and PM data of at least one ride per month.
The easiest way to share your ride data with us is by using our mobile app to track it and upload it to our servers.
Basically by using the app. Connect the app to your power meter before you start a ride and data is collected automatically.
You can then upload data after each ride or just do it from time to time, e.g. once a week or once per month.
Be aware that if you prefer riding using your bike computer, you can do so at the same time. Our app just need to be open and active during the ride, but you can have your phone in your pocket or wherefter you prefer.
The app is logging data when it is connected to your power meter during a ride. You can see counter at the bottom in a dashboard view. To record the data do the following:
- If you press on the red dot, at the left side of the counter, your data logging will be enabled and your data will start recording. As soon as you will start pedaling also time will start running.
- Once you would like to upload data to us, press on the cloud at the right side. This means Upload data to cloud now.
- You will get a notice about files being uploaded.
- If there is no data to upload, the app will warn you.
No. The data we need can only be recorded through the App as it contains way more information than you can collect with a standard head unit.
General about Team ZWATT
Not at all. If you would consider buying a power meter, you are exactly the type of rider we are looking for. We want the products to be tested by the same types of riders that may later buy them.
During the development process we learned a few important lessons:
- Testing by pro riders may be extreme in power and intensity, but it’s not as diverse as the riders actually buying the products
- The difference between power meter algorithms surface when they are put in real life situations
That is why the results generated by the pro riders testing our technology for the brands, is not nearly good enough for us, and we decided to establish Team ZWATT to change this by crowd sourcing the data collection to help take power meter technology to the next level.
- Better algorithms
- Better price
- Better products that works better for your style of riding
These power meter models are being built specifically for Team ZWATT to gather data on the different models and to fit a wide variety of users and bikes.
Being part of Team ZWATT is free. The power meters we are providing for testers are not free. We strive to make them as inexpensive as we can. Our vision is that you should be able to afford a power meter on all your bikes.
You can find the actual prices in the webshop.
There is a fixed price to get the physical product and a monthly maintenance fee to keep it running (after 2 years, the fee goes to zero).
No. We are a startup and not making the kind of money required to do that. Creating Team ZWATT is also a reaction to the idea that you can sponsor equipment for a few riders and get valuable testing -and- promotion in return. Sponsoring is actually not a very good way to get unbiased test results.
We have released arm and spider based power meter solutions (we call them Zimanox and Zpider). These bike parts will come with a power meter module integrated in them. All you have to do to install them is to swap your old bike part with the new.
Not one style fits all and that’s okay. We will have more versions coming. Get on the team and we will keep you updated.
In the August 2016 Kickstarter Campaign, the Zimanox and Zpider versions were offered with a Zpindle MTB as a stretch goal. The September Indiegogo “top-up” Campaign had the Zimanox and Zpider available also.
Team ZWATT is run by SENSITIVUS gauge – a Copenhagen based danish start-up developing advanced electronics for bike brands. The first products include power meter sensors for crank based power meters. Here is a short video pitch we made for our office park (Watch on Youtube).
If we get bought up? We drink champagne. Easy 🙂
No seriously, we have thought of that situation a lot. Since the power meter will default to stop working after a while unless you connect with your smartphone and give it more life. This requires that we are still there to run the servers.
If we get bought up – the buyer will also buy the obligation to continue the service. No problem.
If we close – we will simply unlock all the power meters.
And to make that 100% sure, Rolf Ostergaard (CEO and majority shareholder of the company) has issued a standing order to the lead software developer to unlock all power meters right away if the company looses its ability to make decisions for any reason.
When troubleshooting issues with your power meter, always start by making sure you are using the latest firmware and software.
Have another question?
Please email support to get your question answered by a human if you can’t find the answer you need on this page. Please note, that comments included with the uploaded data, are not addressed to customer support.
Make sure to include app and firmware version numbers, if at all relevant to your question.